Wednesday, February 27, 2013

A City Bag for Me!

I've been making bags and purses to sell for a few years now, but I was still carrying a store-bought purse.  I always talked about making one for myself, but you know how it goes - there's always tomorrow...  someone else's project needs to get done first.  But the strap on my store-bought purse was starting to tear and I knew it was just a matter of time before it would break - and the last time that happened, my purse fell to the ground in the middle of the street.  Just a little embarassing!

So I decided to be proactive this time and make myself a new bag before the old one dies.

The hardest part was deciding what pattern to use...  I've got so many good ones to pick from.  I've always loved the look of the City Bag from You SEW Girl!, but it's a fairly large bag and I've never been one to carry anything that large (I'm only 5'1" and I prefer smaller purses), so I took the pattern to my local copy shop and had them reduce it for me.  I made this one at 80% of the original size and I love the way it looks.  The lines are the same, the style is identical, it's just a little sister to the big one.  However, in hindsight, I should have gone with 85%, as this one is just a tad small.  I really had to weed out my stuff to make everything fit.  The base measures about 10.5" x 3" and the height varies between about 6.5" and 8.5", so it's really not very big.  But so cute & stylish looking!

I also wouldn't put five compartment pockets in my next one.  I put 3 on one side and 2 on the other, and by the time I put stuff in them, there's not much room left in the center of the purse.  The pattern calls for 3 compartment pockets on one side and a long zippered pocket on the other.  That would make more sense, and I'll probably do it that way next time.  Live and learn...  Besides, it will give me an excuse to make another one!

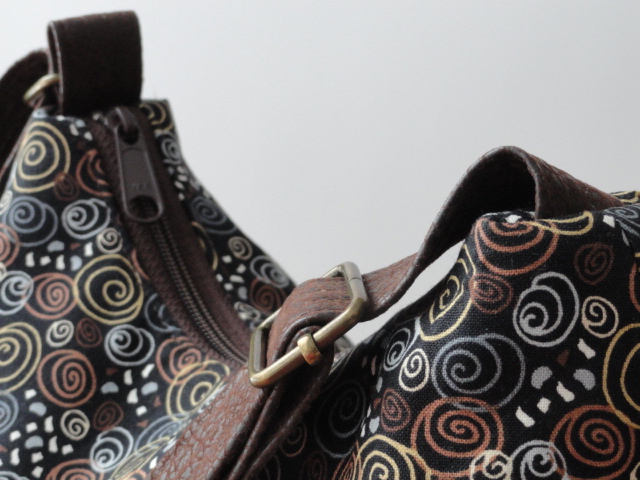
The fabric I used was a gift from a friend and I just love it!  It's perfect for an everyday purse because it has black, brown, white, gray, bronze, gold & silver in it so it will coordinate with just about anything.  I used brown faux leather for the bottom and the straps.  The bottom of a purse can get so dirty and I thought the faux leather would hide the dirt, and wipe up with a damp cloth quite easily.  Besides - I just like the look.  For the lining, I used an old favorite of mine - a city map of Paris that looks hand-drawn.

The strap is adjustable, shown short here to use as a shoulder bag, or I can adjust it longer to wear as a cross-body bag.

So all in all, I'm happy with the finished product, even if it is just a tad on the small side.  I'll start using it for awhile and see how I adjust.

Cheers!

Tuesday, February 26, 2013

Tasting Table Tuesday - Bee Happy!

Before I show you Today's Tasting Table project, I have to share just one (ok - maybe two) family pictures with you.  My granddaughter LOVED all the little gifts I made for her 2nd birthday.  It was so fun to watch her open everything and play with them.  She put the apron on all by herself (yeah!)...
...and gave her mother and me a lesson on how to diaper and dress a baby doll.  So cute!

Now for Today's Tasting Table post...
Another finished project!  Woo Hoo!  I'm happy to say that I'm totally thrilled with my new quilting rulers!  I finished quilting the entire quilt using gray thread to match the background fabric, but still thought that the four gray pinwheels in the center needed more movement.  I really wanted them to look like they were spinning, so I got courageous and added some more curved lines using (yikes!) gold-colored thread!!!
It took a lot of nerve on my part because I never use contrasting thread for free-motion (too afraid my hiccups might show), and I didn't use the rulers for this last bit - just freehanded it, using the previous gray curves as a guide.  But I'm pretty pleased with how it turned out - it might not be perfect, but it suits me just fine.


And I used a cute bee fabric for the back, which explains why I've named this quilt "Bee Happy".
Listed in my Etsy Shop here...

Now I'm on a mission to make a new purse for ME!!!  Check back next time for more details on that!

Cheers!

Tuesday, February 19, 2013

Tasting Table Tuesday - Free Motion Quilting Rulers for Domestic Machines

I have a new Tool on my Tasting Table to Tell you about Today.  I have always been drawn to the perfect quilting that longarmers can achieve on their machines using rulers and templates.  I have always assumed that you can't use rulers while quilting on a domestic sewing machine, because you need both hands free to manipulate the quilt.  I assumed wrong...

A few weeks ago, I looked around the internet to see if any such rulers existed, specifically for domestic machine quilting, and found this website - Accents In Design.

As many of you already know, I'm a drafter.  I learned to draw (draft) in the late 1970's the old-fashioned way using tools like these...
Now you understand why I was always frustrated when my free-motion quilting looked like sketching.  I wanted my circles and arcs to be perfect, not oblong or wonky.  I wanted them to look like they were stitched with templates - just like my drafting.  I know - with practice, practice, and more practice, I might eventually get them almost good enough.

So now I'm using tools like these...  (Continuous Curve Ruler, and Straight Ruler)
and these...  (Quilter's Template Set)

I'll be totally honest and tell you that this is the first time I've used these rulers - or any kind of quilting ruler - and I'm amazed at how easy it is and how well they work.  What makes these rulers different is the strip of velcro on the underside of the ruler, to keep it from slipping, and the two pegs on the top of each ruler.  This makes the ruler very easy to hold in position, while still being able to maneuver your quilt.

This is the Continuous Curve ruler and there is an outward curve on one side, and an inward curve on the other, so I just flip it around from side to side to quilt this curved line design.  (feed dogs are lowered)


There are handy guidelines on each ruler so you can line it up with your seamlines, or any other guides in your quilt.  I moved my index finger out of the way in this shot so you can see the guidelines a little better.  Even though the guidelines aren't on top of my seamlines, you can still "eyeball it" and make sure that they are parallel to the seams, and the center line runs right through the intersection of seams.  This ensures that all the curves will be uniform.

And just as an extra little bit of info - here's how I plan my quilting designs.
I printed an extra copy of my EQ7 drawing for this quilt, then clipped a sheet of transparency film on top.  Then I can play around with different quilting designs using a dry erase marker.  If I don't like a design, I just rub it away with a tissue or scrap of quilt batting and start again!  Then I hang it from the shelf right next to me so I can refer to it as I quilt.

So that's what is on my Tasting Table Today.  Time to head back down to my Cotton Cellar to play with these rulers some more.  I'll share the finished quilt with you soon, and hopefully have more good comments about these rulers - but so far, I'm very impressed and can't wait to try the rest of them out on my next quilt.  If you're interested in learning more about these rulers from Accents In Design, visit their website by clicking here and be sure to watch their videos too.  One shows the rulers used on a longarm, and the other demonstrates them being used on a domestic machine.

Cheers!


Saturday, February 16, 2013

Contest Results

Firstly...  I'd like to thank everyone who voted for me in the Your Andover contest.  I really appreciate everyone's support.

Secondly...  I didn't win.

BUT - I'm deeply honored to have been chosen as a finalist, and best of all - Andover still sent me a prize - even though I came in LAST!  How amazing is that!  The 1st and 2nd place projects were so close together, that Andover actually decided to give them both the first place prize, so they are obviously very generous with their fabric giveaways!

I received another box full of gorgeous charm squares and Andover fabric tote bags.
But the most exciting was a pack of charm squares that contains every one of the 135 colors of Gail Kessler's Dimples collection!!!  (at least I think there are 135 - I haven't counted them yet, but it sure looks like the whole collection!)
I'm in heaven!  I have a couple of ideas already of what to make with these, but I'm sure I'll dream up several more ideas before I make my final decision.  Maybe I'll just let them age a little on a shelf in my Cotton Cellar and enjoy looking at them a little longer...

So if you ever make anything using Andover fabrics, don't be shy about entering your project in their Your Andover contests - you never know what you might win!  Good luck!  And THANK YOU ANDOVER!!!

Cheers!

Tuesday, February 12, 2013

Tasting Table Tuesday - a little girl's birthday

My granddaughter's 2nd birthday is coming up soon, so I've been squeezing in some birthday gift sewing projects between my normal quilting and purse-making.  I had forgotten how much fun it is to sew things for little girls!  I haven't done this kind of work since her mommy was little!  (and Mommy, if you're reading this, you might not want to read any further...)


She doesn't know it yet, but her parents have bought her a play kitchen, so of course, I had to make her a little apron to wear while she "cooks".  (tutorial by sewliberated here)  The little chicks are busy cooking and baking up a storm - such cute fabric!  I chose this tutorial because the neck strap is elasticized and the waist strap is velcroed, so she should be able to put this on and off by herself.  She's at that independent age and wants to do everything on her own now.
She also loves dolls now too, so I made her a doll-baby changing set, consisting of a changing pad, 3 diapers, and 4 flannel "wipes".  I got the idea for these from this blog post by Cottage Mama.
I then continued on with my Birthday Sewing Projects by making her 3 outfits for her doll-baby, using this tutorial by wewilsons.
And lastly, a set of rag-quilt alphabet letters, based on this tutorial from Happy Together.  So simple to make these!  I just made a sandwich of flannel/batting/cotton scraps, sewed the outline of the letter, then trimmed close to the stitching line with pinking shears.  Couldn't be easier!  I knew I saved my scraps for a reason!
So there you go - sorry for the toddler project overload, but these things were all so much fun to make.  I hope she enjoys playing with everything!
Cheers!


Sunday, February 10, 2013

Penny Candy Quilt

I finally finished one of the projects I started at retreat a few weeks ago, and took advantage of the bright weather today to take some pictures and write up my Etsy listing.  I'm really thrilled with how this small quilt turned out, and part of me will be sad when it sells and I have to ship it away to a new home.  But I have to pay for my fabric obsession somehow, so that's just the way it is...

I made this using two of the charm packs I won from Andover a couple of months ago - Lucky Penny - so I've called the quilt "Penny Candy" - because that's what the fabrics remind me of - candy!  A piece in every color and print you can imagine...
The gray chevrons are Kona Medium Gray.

The colored chevrons are quilted with mocha thread, and I used white and a single row of red in the gray chevrons.
The backing is from Lotta Jansdotter's Echo collection and is one of my favorites.  The binding is Moda's Bella Solid in Tomato Soup Red.
"Penny Candy" is for sale in my Etsy shop - here.

Cheers!

Wednesday, February 6, 2013

Thinking in the Shower

My friend Susan blogged about a challenging quilt project she has coming up.  She's wondering where her inspiration will come from.  I replied, and our conversation went something like this:

ME:  "You always come up with fantastic quilts Susan. I have no doubt that you'll do it again, and if you're anything like me, your inspiration will hit at 2am, or while in the shower."
SHE:  "Why is that anyway?  It seems like I always do my best thinking first thing in the morning while I'm in the shower!"

Is this a normal phenomenon?  Do you do your best thinking in the shower?  Those creative thoughts come at a price though.  They drive out all of the other practical things we should be thinking of in the shower - like, "did I remember to shampoo my hair yet?  Or did I just wet it???"

Of course, I was thinking about this in the shower this morning, and by the time I had gathered my thoughts for this post I had washed my body, shampooed my hair, then found myself pumping out more soap to wash again....  arghhh!!!  ...at least, I think I had already washed once...   Is it just me?  Or is it my senior brain?


Monday, February 4, 2013

Need Your Vote Please!

Remember this chemo hat that I made for my friend?
And remember that I won a weekly "Your Andover" contest with it?  Well, I just found out that my hat has made it into the finals!  The winner gets the most amazing prize, and I'd just love to win this.  If you'd like to help, I need your vote.  Click here to view the contestants and place your vote.  I've got my fingers crossed! Please feel free to share the link - the more votes the better!  Thanks so much!!!

Friday, February 1, 2013

Custom Quilted Buttons

I had a little spare time last night, and four crocheted neckwarmers...

...that were waiting for buttons, so I put my Bernina into Free-Motion mode and got busy.

By the time I was ready for bed, I had all eight buttons finished and sewn onto the neckwarmers.  The finished scarves are all now listed on Etsy.  Oh, how I love seeing "DONE" on my project list!