Wednesday, May 18, 2016

Caribbean Blue Ombre Quilt - Update

Mother Nature was much more cooperative today and I was able to take some outdoor pictures of my latest quilt.  No edits on these, other than a little cropping.  The colors are pretty good for a change.  (Although the slight rippling along the top edge of the quilt bugs me - the quilt is flat - that's just where I pinned it to the styrofoam panel.)

Click here and here for all the details about this quilt.  Today's post is just pics.

Enjoy!


Tuesday, May 17, 2016

Tasting Table Tuesday - A Finished Ombre Quilt

Last week I shared the beginnings of my Ombre Quilt.  I finished it yesterday, and attempted a photo-shoot today.

It was so cold and windy, I just knew I wouldn't have any luck with pictures outdoors, so I had to make do with the brightest spot I could find inside, and that still wasn't very bright.

It's hard to get the colors to look true, but this is the closest I could get.  It really is the most gorgeous shade of aqua/turquoise - honest!

That's why I'm naming this quilt Caribbean Blue.

(click here to see the aqua and all the other colors in the Ombre line on Moda's website.  They take much better pictures than I do!)


It still amazes me that this entire quilt top is made from one individual fabric!  The gradient effect is magical.

To begin the quilting process, I threaded my Juki with Smoke MonoPoly and stitched-in-the-ditch of each seam to help stabilize the quilt sandwich.  This really helped keep the layers from shifting, since all the quilting was in one direction.

Then I switched to Real Orange So Fine #50 thread, and stitched parallel lines 1/2" apart, diagonally across the quilt (with my walking foot), curving the lines as they crossed each sphere to further enhance the 3D effect.  It isn't the "spinning" effect I had hoped for, but I still love the dimension it gives.


Since I used Elmer's Washable School Glue to baste the circles in place, and a Water Soluble Blue Marker to mark the quilting lines, I had no choice but to soak the quilt when I finished the quilting.  I have washed my quilts after binding, but never before binding.  I blocked it onto a styrofoam board and left it on my screened porch to dry.

It turned out so square and flat, that I'm now sold on blocking!  Yes, it takes a little more time, and I doubt I'll do it to every quilt I make, but it's definitely worth doing for wall quilts that will hang for display.

I used Kona Caribbean for the binding, and added some Bright Orange Batik Piping as a "zinger".

The backing was a piece I picked up from my local quilt shop, called "Modern Roses" by Stephanie Ryan for Moda.  It's a perfect compliment to the front, don't you think?


Until next Tuesday...
Cheers!

Tuesday, May 10, 2016

Tasting Table Tuesday - An Ombre Quilt

I started collecting Ombre fabrics quite a while ago.  Their subtle gradation of color is so appealing to me.  I have been hesitant to cut into any of them though, because I just couldn't decide what to do with them.

A few weeks ago, a friend showed me a picture of a quilt that just blew my mind.  It looked like it had three dimensional spheres on it.  I couldn't get that quilt out of my mind, so I ordered the pattern.  It's called Orbital View by Mary Lou Hallenbeck of H.D.Designs (here is a link to the shop I bought it from).

The pattern calls for 4 different colors of ombre fabrics.  I had this gorgeous piece of Aqua Ombre by V and Co. and opted to just use the one color.


I used the pattern to make my blocks, but altered the layout as well.  Here is my variation of the Orbital View Quilt, with the blocks all laid out on the floor, ready to assemble.


Every time I look at this, I'm amazed that the entire quilt contains just ONE fabric!  The color gradation does all the work.

I can't wait to get this all sewn together so I can start quilting it.  My plan is to quilt it so the spheres look like they're spinning.  Hope it works!

Cheers!


Sunday, May 1, 2016

IKEA TIVED Sewing Machine Light

Who would have thought that IKEA would have the perfect light for quilters!
Not me, that's for sure!


I love my JUKI TL-2010Q.
But one downfall is the light.  There is one tiny light that is located slightly to the left of the needle, so there is always a shadow to the right of the foot.  It's not a real problem for general sewing and piecing, but it's a real pain when I'm trying to Stitch-In-The-Ditch with my walking foot.  I need to have a good view of the seam I'm trying to stitch in, and that darned shadow blocks my view.

A couple of years ago I found a clamp-on LED Grill Light that worked great.  (You can read my blog post about it by clicking here.)  While the light itself does a good job, the downfall is that it runs on batteries.  With fresh batteries, the lighting was perfect - but as the batteries wore out, the light got continually dimmer and dimmer.  The light never stayed consistent.  Not to mention the small fortune I was shelling out for batteries!

So I went on a search for something similar that was electric.
I found several options, but the flexible gooseneck was always too short.  I needed to be able to position the lamp out of the way. where it wouldn't obstruct the movement of my quilt.

After much searching, I finally found one.
Let me introduce you to the TIVED lamp from IKEA.


Here is a little demonstration of just how much light this gives off.

First, with no lights on the sewing machine - just my standard room lighting...
(isn't that scrap of Kaffe Fassett just gorgeous?)


 Next, with just the standard issue light that came installed on the JUKI.  See how most of the light falls to the left of the needle?


 And this is with the IKEA light added.  Isn't that a HUGE difference?  And because the lamp is on a flexible gooseneck, I can position it anywhere I need, based on what I'm doing.  Ripping out stitches?  No problem - just swing it over and point the spot right on my work.  Left, right, front, back - so much adjustment makes it perfect for practically any brand of machine.

Plus it has the added bonus of being an LED light so it gives of very little heat.  I can wrap my hand comfortably around the conical metal shade when the light is on, and it's just slightly warm to the touch.


 I have mine mounted to the front right corner of my table using the sturdy clamp that came with it.  And see that knurled piece just above the clamp?  I can loosen that and raise the lamp post up or down as I like, then re-tighten to secure it in place.  So there is LOTS of adjustment in this lamp.  (It also came with a mounting plate that allows it to be screwed to the wall, if that works better in your space.)

It also has an ON/OFF switch conveniently located on the cord, several inches from the end of the lamp post.  It's the white rectangle you see under my table.  I could even fasten the switch to the table with double-sided tape if I want to.  The cord is probably 5-6' long (I forgot to measure, sorry) so I had no problem plugging it in to an outlet on the wall.


I'm sure you're now wondering - How Much???  The lamp was $34.99 and since I don't live near an IKEA, I had to order on-line, but with tax and shipping included it was still under $50.

If you have any questions, just leave a comment and I'll do my best to answer.

Cheers!


Thursday, April 21, 2016

Mother's Day Special!

Click Here to visit my Etsy Shop and don't forget to use the coupon code for your free shipping!

Tuesday, April 12, 2016

Tasting Table Tuesday - Shhhh!

Shhhh... - There's a Low Volume Quilt in progress.

I think this is my first real Low Volume Quilt.  Certainly not typical for me, but I think I like it!
Reminds me of my Grandkids and our attempts to teach them how to use their "inside voices".


Cheers!

Wednesday, April 6, 2016

Etsy Changes

Have you seen the new look of our Etsy shops?

Yesterday they rolled out some pretty significant changes.  When you visit a shop now, everything is on one page - no more clicking over to other pages to see sellers policies, shop announcements, About page, testimonials, etc.

It's all right there in one place.  And that's just the beginning.

I have been reading, researching, attending webinars - doing my best to learn as much as I can to make my shop better.  I strongly believe that these changes will really enhance the buying/selling experience for everyone.  If you get a chance, pop over and take a look.

Just click HERE.
(and feel free to "share/like/fave/pin/heart" or whatever floats your boat.  Every click helps.)

I would love to hear your comments about the new look!

In addition to re-working my shop layout, I've also been super excited about my newest product.  I showed you a glimpse of some coasters I made in my last post, and I had so much fun making them that I made some more - and more - and more...
(They're addictive, in case you didn't notice.)

I have two listings up now on Etsy, and more coming soon.

Here is a shot of the ones I'm working on now...


I have so many other fabrics lined up, just waiting to be made into these modern Hexagon Coasters - a mix of solids and prints - all framed with Natural Essex Linen.

Can't wait to get started on more Hexies!

Saturday, March 19, 2016

Remembering the Lady in Red

This is a very special quilt.  I made it for me.  And it has a story...


This coming week marks the one-year anniversary of my mother's passing.  Not a day goes by that I don't think of her and feel her presence.
She was a very talented Interior Designer and had her own business for many years.

Several years ago she gave me a bundle of fabric samples.  Most of her fabrics were decorator fabrics, not really suitable for quilting.  But these were 100% cotton - slightly heavier than quilting cotton - but I thought I might be able to do something with them, so I brought them home and added them to my every-growing stash.  They probably date back to the 1990's and the colors are gorgeous.

I started making coasters.
Quilted, hexagon coasters - pairing the cotton samples with Essex Linen.
I love them, and they are addictive to make.


Recently, I spread the samples out on my cutting table, and once I saw all the colors lined up together, I knew that I had to make a quilt.


I planned, sketched, and researched, trying to come up with a design that would really show off these samples.  Then I remembered this quilt that I saw on the Poppyprint blog a few years ago and knew it would be perfect.  (Thanks for the inspiration, Krista!)

I chose this modern gray and white print for the background  Classical Elements by P&B Textiles.  It highlights every color perfectly.


While cutting the samples into squares for the quilt, I decided to omit the brightest red.  It just seemed so much brighter than the rest and I wasn't sure it would work.

But while making the blocks, I suddenly stopped and thought of how much Mom loved RED.  The last time she visited me, I took her shopping and I'll never forget the image of her walking down Main Street in her Red cape, Red hat, Red purse and Red shoes.

She turned heads.
Sure wish I had taken a picture...

So one one red square went back into the quilt and it became the "heart" of the quilt.


I don't think I would have been happy with the quilt without it now that it's done.

Krista quilted her quilt with concentric circles and I chose to quilt mine with one big spiral.
It is quickly becoming my "go-to" quilting design.  I've done it several times (here and here) and it never gets old.  I just love the modern look and the texture it gives.


So that's the story of my quilt,
"Remembering the Lady in Red".

I think Mom would love it.

(and there is still lots left to make more coasters!)


Saturday, February 20, 2016

New Etsy Listings

Remember the Checkerboard Baby Quilts I blogged about starting in December?
I finally finished 5 of the 6 quilts, and spent the last couple of days taking and editing photos, writing new listings, and generally updating things in my Etsy Shop.

Then I rewarded myself with a walk on this sunny 60 degree February day.  Good for the soul.

As I worked on these quilts, it occured to me that there is nothing that limits them to just baby quilts!
As I wrote in my listing descriptions, they are:
"Perfect on the floor for baby's "tummy-time" play - for a toddler to snuggle under at story time - or for adults who simply want to add a splash of color to a room."

Here is a picture of the five new quilts...

...and a link to the listings in my shop, Cotton Cellar.

Cheers!

Tuesday, January 26, 2016

Sitting Pretty

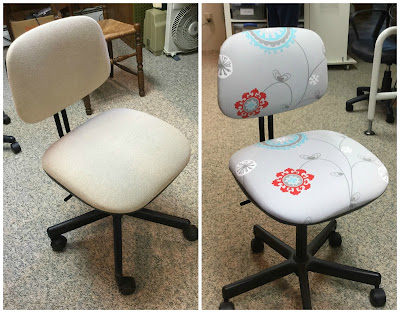
Yesterday, my friend Ann and I spent a fun afternoon together recovering our sewing chairs.  We have talked about doing this forever and finally made a date to get them done.  It was a little harder than we thought, and took longer than planned, but we are both so happy with our results!

Here is my chair, before and after...

And here is Ann's...

Such an improvement over boring old beige!
I think my computer chair is begging to be recovered next...

Cheers!

Tuesday, January 19, 2016

Elephant Quilt

The Elephant Quilt is done and the elephants are just too cute!

I chose to quilt this one in one continuous spiral, then decided it needed to be a little denser, so I went back and stitched a second spiral in between the lines of the first pass.  It really gives the quilt an awesome texture that you just can't help but touch.

Now all that's left is for the expectant parents to get it hung on the nursery wall before this baby boy arrives.


Cheers!


Tuesday, January 12, 2016

Tasting Table Tuesday - Elephant Quilt

Last week I received a special request for an Elephant Quilt for a baby boy's bedroom wall.  Together, we picked this pattern.  Cirque d'Elephant by Sew Much Ado.  The pattern was an instant download after purchase from her Etsy shop.  So easy and quick!

The nursery colors are aqua, celery green and gray.  I found a great selection of fabrics at Shores Quilt Stop in Towanda PA and was able to buy everything I needed in one place.  It's about an hours drive from here along scenic Route 6 - a good excuse to go for a drive.

I used Sharon Schamber's Raw Edge Applique technique to make all the elephant blocks, using spray starch, freezer paper, Liquid Stitch glue, and blanket stitch.  I've used this method before, find it works really well for me, and it has become my preferred method of applique.


I hope to have more pictures to share soon.

Cheers!

Wednesday, January 6, 2016

In The Mood

I've got my mojo back.  I admit, this was an emotional holiday season.  It was the first Christmas without my Mom, and one of my closest friends passed away 10 days before Christmas.  But now it's a new year, and I'm forging ahead with lots of new ideas.

I was busy pin basting a quilt today...


...when it occurred to me - I know what I've been missing...
My MUSIC!


The battery in my bluetooth speaker died in December and I had misplaced my charging cord.  (Well, not really misplaced, I just hadn't taken the time to go look for it.)  My dear husband found it (in my sewing room, no less... ) and brought it upstairs for me.
Once I turned my music on, my quilting MOJO returned. 

 Now I'm In The Mood...

Do you listen to music when you sew?

Cheers!