Sunday, December 21, 2014

Squeaky Feet

As the holidays approach and we wait patiently for our new granddaughter to make her arrival any day now, I've been keeping myself busy by working on my ever-growing stack of quilt tops waiting to be quilted.

A few months ago, I purchased this special foot for my Juki that enables me to do ruler work on this sit-down machine.  It is a hopping foot just like the ones you see on a long-arm machine and it is a full 1/4" high so it rides safely along the edge of the 1/4" high quilting rulers (I use these rulers).


I am slowly gaining confidence as I get used to doing ruler work, and I just love the control that I have with these rulers.  But, as always, there was one thing that was bugging me...

The noise!

As this foot hops up and down, it rubs against the side of the ruler, producing a chirping/squeaking noise not unlike fingernails on a chalkboard.  Now, I admit, I am probably much tenser than I should be, and am holding the ruler way too tight against the foot...  but I'm afraid if I lighten up my grip too much the foot will lose contact with the ruler.  I've tried relaxing, but the squeak keeps coming back every few seconds.

But wait - there's a solution!!!


That's right!  Good old car wax!  I just rubbed a light coating on the outside surface of the foot, where it contacts the ruler, let it dry to a haze, then buffed it out with a soft cloth.  The squeak is gone!!!

Plus, there's an added bonus!  The foot glides along the ruler much more smoothly now.  I didn't realize how much drag and resistance was created when it squeaked.  The car wax reduced all that friction and my quilting is much smoother, and QUIET!

I'm sure I'll have to re-wax it from time to time, but it only takes a couple of minutes, and is really worth the extra effort.  So if you have a squeaky foot, try the wax!

Cheers!


Friday, December 12, 2014

Quilts for the Grand Daughters

Time is getting short!  My daughter is expecting her second baby this month and we had a wonderful visit with them after Thanksgiving.  I made a wall quilt for the nursery and now that it's been delivered, I can finally share it with you here.  They hadn't finished painting the walls yet when we were there, so we weren't able to hang the quilt, but at least it's in their hands, ready to go.

I started with a pattern called Chubby Chicks by Black Mountain Needleworks because I just fell in love with these adorable chicks.  I opted to do the borders differently though, and changed the number of blocks to make it the size I wanted. 


The nursery color scheme is coral and aqua, and the wall color is light aqua, so this should coordinate nicely.  I used white Bella Solid for the background, and assorted aqua and coral prints for the pinwheels and chicks.  The chicks are machine blanket-stitched after fusing them in place using a method of applique I learned from Krista at Poppyprint, (click here for a link).


I got a little more daring with my quilting on this one, and love how it finally turned out.  The chick's tail feathers didn't stand out quite enough, so I added a little colored shading with my water-color pencils.


For the back, I had the perfect fabric already in my stash, just waiting for the right project to come along.  Perfect little aqua birds.  Just had to use this one!

Can't wait to see it on the wall when the nursery is finished.  And it will be soon, because this baby could come any time now.

And her big sister got some new things for her room too!  I shared her quilt with you a while ago, and then proceeded to make a pair of Roman Shades to match, using Joel Dewberry's Aviary, Sparrow in Plum.


They look great in her newly painted purple bedroom, and you can see the corner of her new quilt on the bed as well.  She loves her new purple room.

Tuesday, November 25, 2014

Tasting Table Tuesday - Playing Catch-up

Based on my lack of Tasting Table Tuesday posts in the past weeks, one might think that I've skipped town.   Not...  It's just that I've been busy working on "non-postable" projects lately.  Between making things for Christmas gifts, and gifts for the new grandchild due in a few short weeks, there just hasn't been much that I've been able to share with you.  I'll do my best to make up for that after the holidays, when nothing is secret anymore.

But here are a couple of things I can show you in the meantime.  First is actually a Christmas gift, but I don't think the recipient reads my blog very often, so I'll take a chance and share the pictures without giving away too much detail that might reveal who it's for.  This table runner was made with a piece of gradated blue fabric (from V & Co's Simply Color collection, I think...), mixed with some of Northcott's Stonehenge fabrics.  I love the way the colors drift from light to dark, and I added some stitch-in-the-ditch quilting in a copper metallic thread to give just a hint of glimmer to this runner.  It's really stunning when the sunlight hits at just the right angle.


The other completed project from recent weeks is the Friendship Braid quilt I shared a while back.  After returning from the longarm quilter (thanks Sue B!) I finished the binding and the label and passed it on to my customer.  She was so thrilled, and said it turned out just like she pictured in her mind.  :)


She especially likes hearts, so we selected a pantograph that mixed hearts and swirls together, and it was just perfect.

Now I'm rushing to get a few last-minute projects done, as well as preparing for the upcoming Thanksgiving celebration here this week.  Between holidays and Grammie Duty when this next baby arrives, I'm sure I won't be doing much blogging in the coming weeks, but I'll pop in when I can.  Stay tuned in the new year when I hope catch up with all of you and play catch-up once again.  Happy Holidays!

Cheers!

Friday, October 24, 2014

Pre-Holiday Sale Announcement

***$$$*** SALE ***$$$***

The Christmas Shopping Season is just around the corner.  To help you get an early start, (for a limited time only), I am offering a 15% discount on your total order at my Etsy shop, Cotton Cellar.  To get your discount, simply enter 15OFF2014 in the Coupon Code box at checkout.
(Custom orders excluded.)

And don't forget to shop at the upcoming Holiday Craft Fairs in your local area also.
Support your local Crafters.  Handmade is best!

Cheers!

Tuesday, October 21, 2014

An Aviary Quilt

My three-year-old granddaughter has a new bedroom in a new house and needs a quilt for her new "big girl bed".

 She decided (with her mother's help) on Joel Dewberry's Aviary 2 in Lilac collection.  I took the liberty of adding some fabrics from my stash to the mix.  It's a simple quilt, made up of 6" squares, and I used a light pink from Lotta Jansdotter's Glimma collection for the binding.

I found the backing fabric at Needles Quilt Shop and the colors are a perfect match.

I quilted this one on my Juki sewing machine and used an all-over grid-based design.  Kind of a whirly-gig kind of thing.  I was apprehensive about quilting a full-size quilt on a sit-down machine, but by starting in the center and breaking the quilt into quarters, it was really quite manageable!  I stitched continuously in a manner I learned in a class at MQX, so only had to stop when I ran out of bobbin thread.

I used cotton batting, and I washed and dried it when I was finished, so it's a little more puckered now from the slight shrinkage - but this quilt will get lots of use, so I wanted to put it through it's first wash before I deliver it.

Now I'm making a pair of Roman Shades to match the quilt, using the purple fabric with aqua sparrows.  A little "out-of-my-normal-comfort-zone" type of project, but with the help of this tutorial, I think it will work out just fine.

Cheers!

Monday, October 13, 2014

Let There Be Light

If you're like me, you are always looking for ways to add more light to your work space.  My new Juki TL-2010Q has a new improved light over my previous model, the TL-98Q, but all the light is on the left side of the needle, which throws shadows to the right of the needle.  I don't like shadows...

From what I've found, all of the specialty add-on lights for sewing machines are expensive.  So this blog post by Lori at The Inbox Jaunt caught my eye... Lori shows us a clamp-on LED desk light she found at Lowes, on sale for under $20!  It looked familiar when I saw it, and I remembered that my husband has a Grill Light that looks very similar to Lori's find.

Sure enough, I tried it, and it works great!


It has a screw-clamp base that attachs firmly to my table, and it's also magnetic, if you have any exposed metal on your table, but the clamp works great for me.  And the flexible goose-neck allows me to position it right where I need it without getting in my way.  In fact, I realized after quilting for a short while, that I actually forget that it's there.  Whereas every other lamp I've tried always seemed to be in the way of my quilt.

This has lots of bright LED lights so it's bright and stays cool to the touch.  It takes 3 AA batteries, and so far, I haven't had to change them.  I'm still waiting to see how long they last, but that also eliminates the tangle of adding one more power cord to my table.

So far, I'm loving this light!  Hope my husband doesn't decide to grill after dark any time soon...

Cheers!

Wednesday, October 8, 2014

How to Replace the Lining in a Bag

This is my favorite bag.

You know, the bag that you use every day, that is "broken in" and soft in all the right places.
The bag that fits you like your favorite pair of old slippers.
The bag you want to last forever.

But, like most bags, the lining tore before the outside wore out.

I thought about making a new bag (afterall, I make bags to sell, right?).  But I have so many other projects started right now, and didn't really want to take the time to make a new purse, or shop for a new one, for that matter..  I have too many other things to do!

So then I thought, "why not make a new lining???".  Great idea!

You can do this too!  If you have basic bag-making skills, then it will be a cinch.  Even if you don't, there are tons of on-line tutorials and videos that will teach you the basics.

First you have to pick your fabric.  I detest the shiny black nylon you find lining most store-bought bags.  Besides the fact that it frays and tears so quickly, it's hard to see inside a bag with a black lining.  It's like looking into a dark cave with sunglasses on.  I can't see a darn thing...

I like to use BRIGHT, COLORFUL, LIGHT fabrics to line my bags, so I found a suitable one in my stash and got to work.  (Here's a sneak peek ahead at the end result.  Keep reading if you want to learn how to do this yourself!)

Here's How:

  • Open the seam in the bottom of the lining, then turn the entire bag inside-out through that opening.
  • Study how your bag was constructed, so you'll know how to put it back together.  (hint - you might want to take some closeup pictures to refresh your memory later!)
  • Remove the stitches that hold the lining to the bag and remove the lining.
  • Separate the front and back lining and press each one flat with a warm iron.
  • Using these pieces as pattern pieces, cut out your new lining from the fabric of your choice. (hint - if the seam allowances were narrow and/or frayed, you might want to add a little extra to compensate.  I could see the stitching lines on my old lining and cut my new lining pieces 1/2" beyond that stitching line, to give myself a 1/2" seam allowance to work with.)


  • If you want to add pockets to your lining, do it now.

I chose to duplicate the pockets that were in the original lining, because they worked well for me.  I already had the skills and knowledge of how to make these pockets, but if you need more instruction, just search on-line for "how to add pockets to a bag lining" and you'll find TONS of tutorials.

I put a zippered pocket on one side...

And a double compartment pocket on the other...

  • Sew the sides and bottom of your lining pieces together, just like the original was constructed, making sure to leave a good-sized opening in the bottom.  You'll need this in order to turn everything right side out when you're done.
  • With your bag still inside-out, sew the bag and the lining right-sides-together around the top, just like it was originally constructed.
  • Turn it all right-sides-out through the opening in the bottom of the lining.
  • Hand sew that opening closed, and you're done!


Cheers!

Sunday, October 5, 2014

Elsa Costume

Halloween is coming soon, and I've been busy working on an Elsa costume for my granddaughter.
(I'm sure I don't need to explain who Elsa is, right?  Well, for those who might not know, Elsa is a character in the Disney movie, Frozen.)

She stopped in for a fitting session this weekend.  The sleeves were just pinned in place when I took this picture, but it's now finished and ready to wear.

She loves it, and it even passed the "Twirl Test".

Let It Go!

Tuesday, September 30, 2014

Challenge Quilt

The Mountain Laurel Quilt Guild 2014 Exhibit is over and the quilts are all back in the hands of their makers.  The Challenge Category for this year's show was "4 Elements".  We were challenged to make a quilt, no more than 36" on any side, that depicted our interpretation of any or all of the four elements.
Earth, Wind, Fire, Water.

I chose to do four bands of mosaic squares, each surrounded by solid white, with solid black binding.  Each band is made up of 85 different colored 1 inch squares, with no duplicates.  I was amazed that I could come up with 340 different fabrics, all from my stash!


I free-motion quilted each band with a grid-based filler design that further emphasized the element it represents.

Earth

Water

Wind

Fire

Now the question is...  do I keep it?  Or list it for sale in my Etsy Shop?

By the way, the exhibit was wonderful!  If you saw it in person, great!  If not, and you'd like to see the quilts, I've been told that there will be a slide show on the guild's web site soon.  I'll post a link as soon as it's up.

Cheers!

Saturday, September 27, 2014

Quilting Retreat

I finished two quilt tops at retreat this week.  I think I need to go more often!


Cheers!

Sunday, September 21, 2014

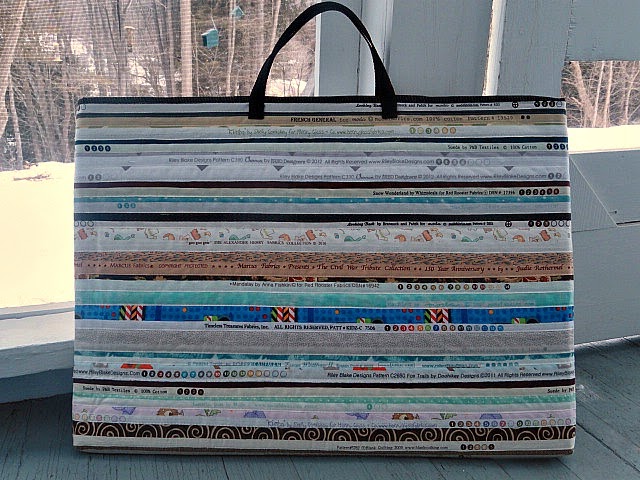
Featherweight Tote from Selvages

Earlier this year, I made a tote bag to carry the extension table for my Singer Featherweight 221, using selvages to make the fabric.  If you missed that post, you can link back here.

Ever since then, I've planned to make a matching tote bag for the Featherweight too.  You see, I just don't quite trust the carry handle on the top of the case.  It's probably fine, but I'm always worried it will break as I'm carrying it, and I certainly don't want to drop the machine!

So I made this little tote bag, and purposely made it so it doesn't cover the hinges or latches, so that it can stay on the machine case at all times.  The webbing straps go all the way under the case in one long continuous piece, so the straps are actually whats carrying the load, not the fabric.
I used the same technique that I used for the extension table bag, selvages stitched to a foundation of duck cloth and fusible fleece.
Here is the extension table bag...
Now I have a matched set, and just in time - because next week is Quilter's Retreat!!!

Cheers!


Thursday, September 18, 2014

Braid Quilt Update

The Friendship Braid quilt is all pieced and ready to deliver to the longarm quilter.  I love how this quilt has turned out and can't wait to share it with you after it's quilted!  It's such a happy, colorful quilt.  I put a narrow blue border around the outside edge, mainly to stabilize all those bias edges, but like the look as well.  It frames the braids nicely.
 My client selected this bright golden yellow polka dot fabric for the back.
Then, as an afterthought, she asked me if I could do two quilted pillow shams to go with her new bed quilt.  Lucky, because I had just enough leftover pieces to do just that!

I quilted these myself, with four rows of zig zag stitching down the center of each braid, then stitched some straight rows in the blue background fabric.

Cheers!